Showing posts with label NoBake. Show all posts

Peanut Butter Caramel No-Bake Icebox Cake

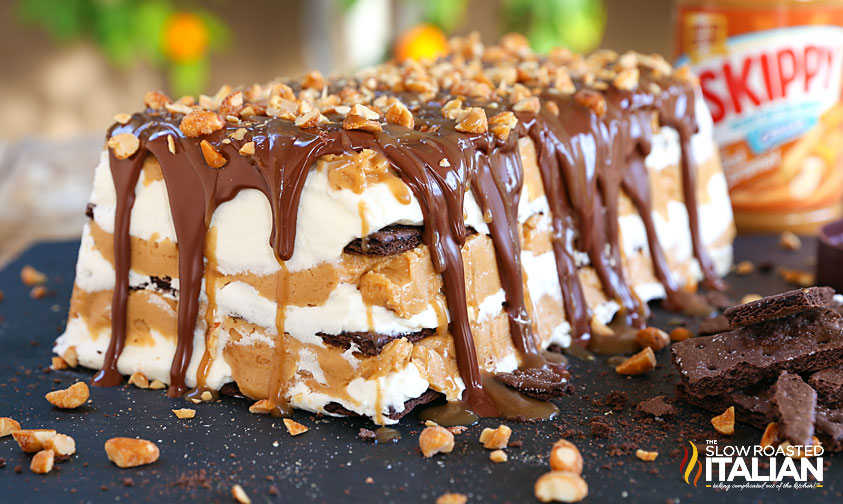
This no-bake cake starts with a flavor explosion of peanut butter, caramel and chocolate. What could possibly be better? How about a simple recipe with mind blowing results? This fabulous cake is stacked with layer upon layer of sweet and salty creamy peanut butter filling, cream and chocolate cookies. After a trip to the fridge the layers become this incredibly moist and creamy cake... all without ever turning the oven on.
 bake cake starts with a flavor explosion of peanut butter Peanut Butter Caramel No-Bake Icebox Cake


Now if you will excuse me, I need to take a moment to collect my thoughts (and be alone with the last piece of this divine dessert).

My family has been eating Skippy Peanut Butter as long as I can remember. We are a peanut butter household. Whether is it a simple pb&j sandwich, an apple and peanut butter snack, Extreme Peanut Butter Fudge Brownies that leave this house by the truckload or just a spoonful for the heck of it, we our Skippy. Truth be told I have a really great supply of Skippy on hand at all times.  You know, back ups in case we run out and then we have back ups for our back ups just to be sure. LOL

bake cake starts with a flavor explosion of peanut butter Peanut Butter Caramel No-Bake Icebox Cake
So, I got to work on this fabulous Peanut Butter Caramel No-Bake Ice Box Cake. What is a better flavor combination than peanut butter and chocolate? Peanut butter, caramel and chocolate. Oh my goodness.  It is insanely delish. Layer upon layer of fabulous flavors. I mean look at those scrumptious layers. Peanut butter caramel cream, fresh whipped cream and chocolate graham crackers topped with chocolate, caramel and nuts (because this girl likes some crunch).

This simple recipe is no-bake and only takes a handful of ingredients. Chill it for a few hours or overnight. We like to store it in the freezer and it is the perfect make ahead dessert. Scrumptious and wholly impressive.
bake cake starts with a flavor explosion of peanut butter Peanut Butter Caramel No-Bake Icebox Cake

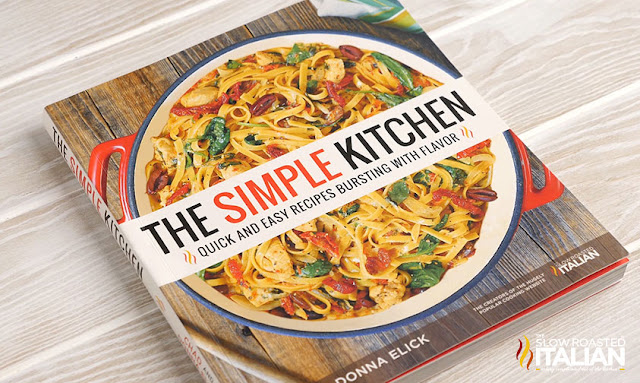
Speaking of simple recipes, of course our new cookbook {The Simple Kitchen - available to order now}is packed with delicious, easy recipes.

The Simple Kitchen is loaded with more than 75 BRAND NEW recipes and a hand full of family favorites too.

8 chapters with a total of 82 quick and easy recipes that are bursting with flavor!!!

Every recipe has a photo that will make your mouth water. It has slow cooker meals, one-pot recipes, quick dinners, simple appetizers, desserts and more!!!

And we have included kitchen tips to make dinnertime less stressful.

We are so excited to share our recipes with you!!! So, don't wait. Go and grab yours today!  The Simple Kitchen <-- click here to order. 

bake cake starts with a flavor explosion of peanut butter Peanut Butter Caramel No-Bake Icebox Cake

Helpful Tips to make Peanut Butter Caramel No-Bake Ice Box Cake:


What you will need to make Peanut Butter Caramel No-Bake Ice Box Cake:


Enjoy!

With love from our simple kitchen to yours. 


Do you   love  TSRI?  Don't miss another recipe.  Click here to Subscribe to by Email and receive new recipes in your inbox every day!
Don't miss a thing! Follow us on Facebook Twitter Pinterest | Instagram ❤ ❤ ❤  
bake cake starts with a flavor explosion of peanut butter Peanut Butter Caramel No-Bake Icebox Cake

Check out more of our favorite no-bake recipes:   


Yield: 12

Peanut Butter Caramel No-Bake Ice Box Cake

This no-bake cake starts with a flavor explosion of peanut butter, caramel and chocolate. What could possibly be better? How about a simple recipe with mind blowing results? This fabulous cake is stacked with layer upon layer of creamy peanut butter filling, cream and chocolate cookies. After a trip to the fridge the layers become this incredibly moist and creamy cake... all without ever turning the oven on.
prep time: 25 minscook time: total time: 25 mins

Ingredients

  • 2 cups heavy whipping cream
  • 1 3/4 cups powdered sugar, divided
  • 1 teaspoon pure vanilla extract
  • 8 ounces cream cheese, softened
  • 1 (15 ounce) jar creamy peanut butter
  • 10-15 chocolate graham crackers
  • 4 ounces chocolate shell ice cream topping (check out our homemade version here)
  • 2 tablespoons caramel topping
  • 1/4 cup honey roasted peanuts, chopped

Instructions

  1. In a tall bowl whip heavy cream with an electric mixer until you can start to see a defined trail through the cream. Add vanilla and slowly add 3/4 cup powdered sugar. Whip until stiff peaks form. (In other words when you turn off the blender and lift the beaters out of the cream, the cream stand up on the end of the beater). Place in the refrigerator while you prepare the remaining ingredients.
  2. To prepare the filling: Combine cream cheese, peanut butter and 1 cup powdered sugar in a large mixing bowl. Beat with an electric mixer until light and fluffy (about 3 minutes). Fold in 1/2 of the whipped cream until it is completely incorporated. Set aside.
  3. Line a 9 x 5-inch baking dish with parchment paper or plastic wrap. Layer 1/3 of the peanut butter cream on the bottom of the pan. Smooth into an even layer.  Add 1/3 of whipped cream on top of the peanut butter cream and use spatula to smooth into an even layer. Top with a layer of graham crackers, breaking them if necessary to make them fit.
  4. Repeat the layers 2 more times, ending with graham crackers. They will slightly peek over your baking dish.
  5. Cover and refrigerate 3-4 hours or freeze for 1-2 hours.
  6. Remove cake from refrigerator or freezer, invert pan onto a plate. Pour chocolate shell topping onto cake (starting at one end and working to the other).  While you are pouring, use an offset spatula to smooth and help the chocolate drip down the sides. Keep in mind the chocolate will harden so you must work fast.
  7. Drizzle the chocolate top with caramel and sprinkle with chopped peanuts.
  8. Refrigerate until ready to serve or serve immediately.
  9. Enjoy!


Originally published 2/20/15

Disclosure: Posts may contain affiliate links. If you purchase a product through an affiliate link your price will remain the same and will automatically receive a small commission. Thank you for supporting us, it helps us keep creating new recipes.
Sumber https://www.theslowroasteditalian.com

No-Bake Cap'n Crunch Avalanche Cookies

No-Bake Cap'n Crunch Avalanche Cookies are a simple 5-ingredient recipe that comes together in just 15 minutes! Imagine creamy peanut butter fudge swirled with chocolate and speckled with Cap'n Crunch cereal and fluffy marshmallows. It's the ultimate treat. A creamy, fudgy, crunchy, peanut buttery treat that has the right touch of chocolate and is perfectly sweet! Hurry, you probably have everything you need to make this in your pantry!

n Crunch Avalanche Cookies are a simple  No-Bake Cap'n Crunch Avalanche Cookies


We are so excited to be partnering with Safeway  to bring you another fabulous recipe.

RECIPE AT THE BOTTOM 


We went absolutely nuts over this recipe and I know you will too. Everyone loves our No-Bake Avalanches Cookies and you know me. I have to tinker with our favorites and create new versions. So of course, I took our original recipe and amped it up and created our Rocky Road Avalanche Bars which are in our new cookbook: The Simple Kitchen. Available for pre-order now!

They are truly so amazing that I knew I needed to create another avalanche cookie recipe and when I saw that Cap'n Crunch cereal is apart of the #FuelURAdventure campaign at Safeway, I knew I found the perfect ingredient.

We have a Safeway right around the corner and shopping there helps me fuel my summer adventure with some of my favorite PepsiCo products like Quaker Cap’n Crunch, Lay’s Classic Potato Chips, Tostitos Scoops, Gatorade G2 Lemon Lime, Quaker Life Cereal, Aquafina bottled water and Veggie Harvest Tomato Basil and Cheese-flavored Sun Chips.

We love easy to grab snacks and no-bake desserts all through summer and I can find all these great products here in Phoenix at my local Safeway store—be sure to check out these great products at your local Albertsons Companies family of  stores, including ACME Markets, Albertsons, Safeway, Jewel-Osco, Vons, Pavilions, Randalls, Tom Thumb, Shaw’s, Star Market, United Supermarkets and Market Street.


Purchase these products through August 17th and you can earn 4x Gas Reward Points to fuel your summer adventure as part of VONS/Safeway/Albertsons’ Anniversary Sale! (Restrictions and exclusions apply. See your local store for details.)


Show your local Albertsons Companies store how you #FuelURAdventure for a chance to win a $500 grocery gift card. Entry is easy as 1-2-3:

1. Take a photo featuring one or more participating PepsiCo. product (listed below) showing how they fuel your summer adventure
2. Share your photo on Instagram, Twitter or enter here by 8/17
3. Use #FuelURAdventure in your caption and don’t forget to tag your local store!

For official rules and more details, visit here

Participating PepsiCo. products that you can find at your local Albertsons Companies store:
•    Quaker Cap’n Crunch (14 oz.)
•    Gatorade G2 Lemon Lime (32 oz.)
•    Lay’s Classic Potato Chips (family size 10.75 oz.)
•    Tostitos Scoops (10 oz.)
•    Quaker Life Cereal (13 oz.)
•    Aquafina bottled water (24pk 16.9 oz. bottles)
•    Gatorade (32 oz.)
•    XL Sunchips Veggie Harvest Tomato Basil and Cheese (7 oz.)


n Crunch Avalanche Cookies are a simple  No-Bake Cap'n Crunch Avalanche Cookies

Speaking of simple recipes, of course our new cookbook {The Simple Kitchen - available to order now}is packed with delicious, easy recipes.

The Simple Kitchen is loaded with more than 75 BRAND NEW recipes and a hand full of family favorites too.

8 chapters with a total of 82 quick and easy recipes that are bursting with flavor!!!

Every recipe has a photo that will make your mouth water. It has slow cooker meals, one-pot recipes, quick dinners, simple appetizers, desserts and more!!!

And we have included kitchen tips to make dinnertime less stressful.

We are so excited to share our recipes with you!!! So, don't wait. Go and grab yours today!  The Simple Kitchen <-- click here to order. 

n Crunch Avalanche Cookies are a simple  No-Bake Cap'n Crunch Avalanche Cookies


Helpful Tips to make No-Bake Cap'n Crunch Avalanche Cookies:

  • Keep refrigerated for best results.

    What you will need to make No-Bake Cap'n Crunch Avalanche Cookies:

    Enjoy!

    With love from our simple kitchen to yours. 


    Do you   love  TSRI?  Don't miss another recipe.  Click here to Subscribe to by Email and receive new recipes in your inbox every day!

    Don't miss a thing! Follow us on Facebook Twitter Pinterest | Instagram ❤ ❤   

    Check out more of our favorite no-bake recipes: 

    Strawberry Shortcake No-Bake Icebox Cake
    No-Bake Avalanche Cookies
    Lucky Charms No-Bake Icebox Pie
    10 Minute Microwave Peanut Brittle


    Yield: 24

    No-Bake Cap'n Crunch Avalanche Cookies

    No-Bake Cap'n Crunch Avalanche Cookies are a simple 5-ingredient recipe that comes together in just 15 minutes! Imagine creamy peanut butter fudge swirled with chocolate and speckled with Cap'n Crunch cereal and fluffy marshmallows. It's the ultimate treat. A creamy, fudgy, crunchy, peanut buttery treat that has the right touch of chocolate and is perfectly sweet! Hurry, you probably have everything you need to make this in your pantry!

    Ingredients

    • 1/2 cup mini chocolate chips
    • 16 ounces (about 2-1/2 cups) white chocolate chips
    • 16 ounces (about 1-3/4 cups) honey roasted chunky peanut butter
    • 3 cups Cap'n Crunch cereal
    • 1 1/2 cups mini marshmallows

    Instructions

    1. Prepare 2 baking sheets with silicone mats or parchment paper. Set aside.
    2. Place mini chocolate chips in the freezer, until ready to use.
    3. Melt white chocolate chips in a large heat safe bowl, microwave 30 seconds at a time until melted and smooth, stirring between each interval.
    4. Add peanut butter to the melted white chocolate chips. Stir until well mixed.
    5. Add cereal to peanut butter mixture and fold in. Allow mixture to cool to room temperature (or until barely warm), if necessary. Mine was room temperature and didn't need to cool.
    6. Fold in marshmallows and frozen chocolate chips, the chocolate chips will melt slightly and create delicious streaks of chocolate throughout your cookies. Don't overmix or the chocolate chips will complete dissolve.
    7. Use a 2 tablespoon scoop to portion treats onto the prepared cookie sheets. Lightly press down on the top of each cookie with the back of the scoop to spread the cookie out.
    8. Refrigerate until firm, about 15 minutes. Keep refrigerated for best results.
    9. Serve and enjoy!


    This is a sponsored conversation written by me on behalf of Albertsons, Safeway and VONS. The opinions and text are all mine.

    Disclosure: Posts may contain affiliate links. If you purchase a product through an affiliate link your price will remain the same and will automatically receive a small commission. Thank you for supporting us, it helps us keep creating new recipes.

    Sumber https://www.theslowroasteditalian.com

    Cherry Chocolate Chip Brownie Icebox Cheesecake

    Layer upon layer of rich chocolaty brownies, perfectly sweet cheesecake and cherries come together to create your new favorite no-bake summer dessert. Cherry Chocolate Chip Icebox Cheesecake is a simple icebox cake recipe that is bursting with flavor. This recipe is a keeper!
    Layer upon layer of rich chocolaty brownies Cherry Chocolate Chip Brownie Icebox Cheesecake


    A few months ago we were introduced to Brownie Brittle.  My snacking and dessert life has not been the same ever since.  My favorite part of the brownie is always the crisp bits around the edges and when I found these portable brownies edges I was absolutely thrilled.  We are so excited to be partnering with Brownie Brittle.


    Brownie Brittle has become a fun part of my snacking and dessert flavors.  I have enjoyed snacking on the rich, dense brownie squares.  But I knew I needed to create fabulous desserts with it too. This icebox cake is just one of the outrageous brownie recipes.  I have a quart of homemade Brownie Brittle Ice Cream chilling in the freezer too.  I have so many ideas for recipes.  What would you do with it? 

    Layer upon layer of rich chocolaty brownies Cherry Chocolate Chip Brownie Icebox Cheesecake
    This icebox cake is easy to create, but the flavors are far from simple. Layer upon layer of rich chocolate chip Brownie Brittle, creamy cheesecake and swirls of cherry syrup is enough to make your heart go pitter-patter.  I mean really look at those gorgeous layers, don't you just want to dive into that cake?

    To really take this recipe over the top, it is frosted with a scrumptious vanilla whipped cream and decorated with Brownie Brittle bits and crumbs.  Topped with sweet cherries this recipe has earned a permanent place in your recipe file.   It is truly a dancing in your kitchen kind of dessert.  As soon as one bite hits your tongue you will be singing a chorus of the "mmmm mmmm good" variety and twirling and dancing. 

    This cake is all about the Brownie Brittle!  The richness really comes through and takes a simple icebox cake to a whole different level.  If you have never tried it, I recommend you pick up a bag.  I am a brownie lover from way back and I have always cut out the center of the brownie and kept the edges for me.  I love the enhanced flavor of the Brownie Brittle cookies.  Chocolate Chip is my favorite, but I have to say Mint Chocolate Chip is amazing.  The crunchy toffee bits in the Toffee Crunch and velvety caramel chips in the Salted Caramel make these absolutely addictively delish! They are all awesome.  Needless to say Brownie Brittle and I are a match made in heaven.

    Enjoy!

    With love from our simple kitchen to yours. 

    Layer upon layer of rich chocolaty brownies Cherry Chocolate Chip Brownie Icebox Cheesecake =================================================================

    PRINT RECIPE

    Cherry Chocolate Chip Icebox Cheesecake
    SERVES 12  |  ACTIVE TIME 30 Min  |  TOTAL TIME 4 Hours 30 Minutes

    2 (8 ounce) packages cream cheese, softened
    1 cup granulated sugar
    3 cups heavy whipping cream, divided
    2 vanilla beans, divided
    juice of 1 lemon, about ¼ cup
    2 (4 ounce packages) Brownie Brittle Chocolate Chip
    ½ cup powdered sugar
    pinch salt
    1 (21 ounce) can country cherry pie filling, divided

    Line a 9”x5” baking pan with parchment paper or plastic wrap.  Set aside.

    In a large bowl combine cream cheese and granulated sugar with an electric mixer until combined.  Add 1½ cups heavy cream and beat until combined. 

    Split one vanilla bean down the middle lengthwise and use the back of your knife to remove the seeds.  Add seeds from one vanilla bean and lemon juice to cream cheese mixture.  Whip until light and fluffy.

    Pour ½ cup heavy cream into a shallow bowl.  Set aside.  If desired you can pour cherries into a sieve over a bowl to separate the cherries and the syrup.  Return cherries to can and use syrup in the next steps.

    Add 1 cup cheesecake to baking pan and use spatula to smooth into even layer.  Quickly dip Brownie Brittle pieces into heavy cream, one at a time, and place onto cheesecake mixture covering the entire pan (this will take about 6 -8 pieces per layer).  Repeat cheesecake layer and brownie layer again. 

    Layer 1 cup cheesecake on 2nd layer of Brownie Brittle and a little less than add half of cherry pie filling syrup.  Quickly dip Brownie Brittle pieces into heavy cream, one at a time, and place onto cherry pie filling syrup covering the entire pan (this will take about 6 -8 pieces per layer).  Repeat cheesecake layer, brownie layer and syrup again.  Reserve remaining Brownie Brittle.  Crush into crumbs and set aside.  Cover with plastic wrap.  Freeze 4 hours, up to overnight.

    Once the cake is frozen: prepare the frosting.  In a tall bowl whip remaining 1 cup heavy cream with an electric mixer until you can start to see a trail of the mixer through the cream.  Split one vanilla bean down the middle lengthwise and use the back of your knife to remove the seeds.  Add vanilla seeds, salt and powdered sugar. Whip until stiff peaks form.  (In other words when you turn off the blender and lift the beaters out of the cream, the cream stand up on the end of the beater).  Chill until ready to use.

    Remove cake from freezer, invert pan onto a plate.  Frost with whipped cream.  Sprinkle remaining crumbs onto side of cake and gently press into whipped cream.  Store in freezer until ready to serve.

    To prepare for serving:  spoon reserved cherries over the top.

    Serve and enjoy!

    COOK'S NOTE:  You may substitute 2 teaspoons pure vanilla extract for the vanilla beans.


    Recipe developed by Donna Elick -
    Copyright ©2014 – All rights reserved. 

    Disclosure:  This is a sponsored post in partnership with Brownie Brittle.  All opinions are my own. 

    Sumber https://www.theslowroasteditalian.com

    Salted Caramel Rice Krispies Treats

    Salted Caramel Rice Krispies Treats are light and airy with a soft and chewy texture and the perfect amount of crunch. The caramel adds a rich, buttery finish to the addictive dessert. This simple recipe is loaded with marshmallows which adds to the softness. They are an amazing salty-sweet treat and my newest obsession!
     are light and airy with a soft and chewy texture and the perfect amount of crunch Salted Caramel Rice Krispies Treats


    I make Rice Krispies so often I should be a professional. I have shared a few of my favorite creations with you, but I have so many that I can't wait to post. One of them are these Salted Caramel treats.

    Do you remember Chad's 3 tier Peanut Butter Rice Krispies cake from 2011? Let's say it was impressive looking, but it was responsible for some hard core roof of the mouth injuries. It tasted so good that I kept eating it though. Years later I realized that you want your Rice Krispies treats to be light and airy.

    Whatever you do, do not compress them down or you will regret it later. LOL.

    I am excited to share my latest creation with you. I know you are going to love it! So what are you waiting for?


     are light and airy with a soft and chewy texture and the perfect amount of crunch Salted Caramel Rice Krispies Treats

    Speaking of simple recipes, of course our new cookbook {The Simple Kitchen - available to order now}is packed with delicious, easy recipes. The Simple Kitchen is loaded with more than 75 BRAND NEW recipes and a hand full of family favorites too.

    8 chapters with a total of 82 quick and easy recipes that are bursting with flavor!!! Every recipe has a photo that will make your mouth water. It has slow cooker meals, one-pot recipes, quick dinners, simple appetizers, desserts and more!!! And we have included kitchen tips to make dinnertime less stressful.

    We are so excited to share our recipes with you!!! So, don't wait. Go and grab yours today!  The Simple Kitchen <-- click here to order. 

     are light and airy with a soft and chewy texture and the perfect amount of crunch Salted Caramel Rice Krispies Treats


    Helpful Tips to make Salted Caramel Rice Krispies Treats:

    • To make an 8"x8" or 9"x9" pan, simply divide the recipe in half. 
      I spray a silicone spatula with non-stick spray to gently press treats into an even layer, and it keeps the treats in the pan and not sticking to my spoon.

      What you will need to make Salted Caramel Rice Krispies Treats:

      • 9x13 Baking DishI have my favorites and this set is one of them. The 9x13 is perfect for casseroles and the smaller size is awesome for making 1/2 a casserole recipe.
      Enjoy!

      With love from our simple kitchen to yours. 

      Do you   love  TSRI?  Don't miss another recipe.  Click here to Subscribe to by Email and receive new recipes in your inbox every day!

      Don't miss a thing! Follow us on Facebook Twitter Pinterest | Instagram ❤ ❤   

       are light and airy with a soft and chewy texture and the perfect amount of crunch Salted Caramel Rice Krispies Treats

      Check out more of our favorite dessert recipes: 


      Yield: 24

      Salted Caramel Rice Krispies Treats

      Salted Caramel Rice Krispies Treats are light and airy with a soft and chewy texture and the perfect amount of crunch. The caramel adds a rich, buttery finish to the addictive dessert. This simple recipe is loaded with marshmallows which adds to the softness. They are an amazing salty-sweet treat and my newest obsession!
      prep time: 20 MINScook time: total time: 20 mins

      Ingredients

      • 8 tbsp (1 stick) unsalted butter 
      • 20 ounces mini marshmallows (about 11 cups), divided 
      • 1 (11-ounce) bag caramel bits 
      • 8 cups Rice Krispies cereal
      • 2 tsp kosher salt 

      Instructions

      1. Spray a 9"x13" baking dish with non-stick spray.
      2. Melt butter in a large ( 8 quart) pot over medium-low heat. Once butter is completely melted, add 7 cups of marshmallows and the caramel bits. Stir to combine. Stir occasionally until the marshmallows, and caramels melt completely. 
        Once the mixture is smooth and combined, add the cereal and salt. Stir to combine. Add the remaining 4 cups marshmallows. Stir until combined. 
      3. Scoop into your prepared baking dish. Gently press into your baking pan. The more you press them down, the denser they become. I love light and airy, ooey-gooey treats. So, press gently. 
        Cut treats and serve. Enjoy! 

      DONNA'S NOTES

      1. To make an 8"x8" or 9"x9" pan, simply divide the recipe in half. 
        I spray a silicone spatula with non-stick spray to gently press treats into an even layer, and it keeps the treats in the pan and not sticking to my spoon.
       Recipe developed by Donna Elick -
      Copyright ©2016 – All rights reserved.


      Disclosure: Posts may contain affiliate links. If you purchase a product through an affiliate link your price will remain the same and will automatically receive a small commission. Thank you for supporting us, it helps us keep creating new recipes.


      Sumber https://www.theslowroasteditalian.com

      White Chocolate Peppermint Crockpot Candy (With Video)

      White Chocolate Peppermint Crockpot Candy is creamy, crunchy and very festive. Loaded with cashews, peanuts, almonds and refreshing peppermint candy.
      White Chocolate Peppermint Crockpot Candy White Chocolate Peppermint Crockpot Candy (With Video)


      White Chocolate Peppermint Crockpot Candy is the must make holiday dessert. Seriously guys, if you have never tried Crockpot Candy, you are missing out! It is so easy to make, you add all the good stuff to your crockpot, and you are done. It does not get any easier than this. This White Chocolate Peppermint Crockpot Candy is festive and tastes very refreshing thanks to the crushed peppermint candies. Three types of nuts: peanuts, slivered almonds and cashews, are also coated in velvety white chocolate. Topped with more crushed peppermints and green sanding sugar!

      Hey guys, it's Catalina from Sweet and Savory Meals here. I am happy to be a contributor on TSRI and add recipes to Donna and Chad's already great collection. Since I noticed that you are enjoying crockpot recipes, I am bringing you today a sweet one, because I am a sucker for dessert! And if you are looking for more holiday desserts to add to your list, also try these No-Bake Cake Batter Truffles, they are tasty, easy to make and very good looking!


      White Chocolate Peppermint Crockpot Candy White Chocolate Peppermint Crockpot Candy (With Video)

      Speaking of simple recipes, of course our new cookbook {The Simple Kitchen - available to order now}is packed with delicious, easy recipes.

      The Simple Kitchen is loaded with more than 75 BRAND NEW recipes and a hand full of family favorites too.

      8 chapters with a total of 82 quick and easy recipes that are bursting with flavor!!!

      Every recipe has a photo that will make your mouth water. It has slow cooker meals, one-pot recipes, quick dinners, simple appetizers, desserts and more!!!

      And we have included kitchen tips to make dinnertime less stressful.

      We are so excited to share our recipes with you!!! So, don't wait. Go and grab yours today!  The Simple Kitchen <-- click here to order. 

      White Chocolate Peppermint Crockpot Candy White Chocolate Peppermint Crockpot Candy (With Video)

      WHERE TO ORDER:

      🔥 Amazon   ðŸ”¥ Barnes & Noble   ðŸ”¥ Books-a-Million  ðŸ”¥ IndieBound

      Helpful Tips to make White Chocolate Peppermint Crockpot Candy:

      •  I like to use a mix of white chocolate chips and melting chocolate wafers. The latest are creamier, therefore they give the candy that velvety texture. If you can't get your hands on melting chocolate wafers (aka candy melts), do NOT substitute with chocolate chips, but rather use same amount of a good quality white chocolate bar. Keep in mind, you need good white chocolate for this recipe to taste amazing!
      • Do NOT try to take a shortcut and cook the candy on High, the recipe doesn't take long to make on the Low setting. If you cook it on high, chances that some of the chocolate will burn are very high.
      • You can substitute some of the nuts if you are allergic or just don't like some.
      • Yes, you can make this recipe without the peppermint candies, if you are not a fan.
      • Very important: don't forget to stir, this will ensure uniform cooking.

      What you will need to make White Chocolate Peppermint Crockpot Candy:

      • Slow Cooker - the slow cooker is almost my most used kitchen gadget, especially during fall/winter! It's just so convenient, and lets face it, it makes comfort food taste even better!
      • White Chocolate Chips - I buy them in bulk, I always have some on hand.
      • White Chocolate Melting Wafers - These are of high quality, creamy and specifically designed for melting and candy making.

      Enjoy!

      With love from our simple kitchen to yours. 

      Do you   love  TSRI?  Don't miss another recipe.  Click here to Subscribe to by Email and receive new recipes in your inbox every day!

      Don't miss a thing! Follow us on Facebook Twitter Pinterest | Instagram ❤ ❤   

      Check out more of our favorite Crockpot Candy recipes: 

      Crockpot Candy
      Crockpot Turtles Candy
      White Chocolate Crockpot Candy Clusters


      See how easy this White Chocolate Peppermint Crockpot Candy is to make. Watch the video!!!


      White Chocolate Peppermint Crockpot Candy
      SERVES 16  |  PREP TIME 10 Min  |  COOK TIME 1 Hour

      1 cup cocktail peanuts
      1 cup cashews
      1/2 cup slivered almonds
      1 cup peppermint candy, crushed
      1 cup white chocolate chips
      20 ounces white chocolate melting wafers

      Garnish:
      1/4 cup peppermint candy, crushed
      1 tablespoon green sanding sugar

      Add nuts, crushed peppermint candy, white chocolate chips and white chocolate melting wafers to the slow cooker. Distribute evenly. Close.

      Cook on low for 1 hour. Stir the mixture every 30 minutes.

      If after one hour the chocolate is not fully melted, cook for another 15-20 minutes.

      Once the chocolate is fully melted, stir well to combine.

      Line a cookie sheet with parchment paper and using a 2 tablespoon cookie scoop, scoop the candy onto the baking sheet.

      Immediately garnish with crushed peppermint candies and green sanding sugar.

      You can refrigerate the candy for 15 minutes to settle quicker, or just leave it at room temperature and it will settle in about 30-40 minutes.

      Enjoy!

      Looking for more candy recipes? This Almond Joy Roll  is always a hit! No bake, creamy, chocolaty and loaded with coconut!

      Recipe developed by Catalina Castavet for
      Copyright ©2017 – All rights reserved.


      Disclosure: Posts may contain affiliate links. If you purchase a product through an affiliate link your price will remain the same and will automatically receive a small commission. Thank you for supporting us, it helps us keep creating new recipes.
      Sumber https://www.theslowroasteditalian.com

      No-Bake Summer Berry Icebox Cake

      Summer Berry Icebox Cake is surely a crowd-pleaser.  It is an easy summer dessert recipe that is so simple, but looks like you spent hours making it!
       It is an easy summer dessert recipe that is so simple No-Bake Summer Berry Icebox Cake

      With layers of sweet whipped cream, a hint of lemon, graham crackers and fresh berries make this summer dessert recipe my latest obsession!

      As the weather warms and flowers start to bloom, it's time to start thinking about all those juicy fresh berries that are waiting to be made into something special. This Summer Berry Icebox Cake is just that!

      Hi! It's Erin from Suburban Simplicity sharing one of the easiest cakes you can make! You know I love Simplicity....especially in the kitchen! Speaking of easy, my family devours these Easy Oatmeal Bars and these Blueberry Oatmeal Bars. You'll definitely want to give them a try.

       It is an easy summer dessert recipe that is so simple No-Bake Summer Berry Icebox CakeIf you have 20 minutes to prep this no-bake cake, you can pop it in the fridge and enjoy its simple flavors and light creamy texture when you're ready to serve!  No need to turn your oven on!

      This is the perfect cake to serve for the patriotic holidays - just create a flag pattern on top with your berries!


       It is an easy summer dessert recipe that is so simple No-Bake Summer Berry Icebox Cake

      Speaking of simple recipes, of course our new cookbook {The Simple Kitchen - available to order now}is packed with delicious, easy recipes.

      The Simple Kitchen is loaded with more than 75 BRAND NEW recipes and a hand full of family favorites too.

      8 chapters with a total of 82 quick and easy recipes that are bursting with flavor!!!

      Every recipe has a photo that will make your mouth water. It has slow cooker meals, one-pot recipes, quick dinners, simple appetizers, desserts and more!!!

      And we have included kitchen tips to make dinnertime less stressful.

      We are so excited to share our recipes with you!!! So, don't wait. Go and grab yours today!  The Simple Kitchen <-- click here to order. 

       It is an easy summer dessert recipe that is so simple No-Bake Summer Berry Icebox Cake

      Helpful Tips to make Summer Berry Icebox Cake:

      • Make sure you wash and let the berries dry before putting them in your cake. The excess moisture can make the berry juice run and turn the creamy white layers pink.
      • Make it your own creation and add optional topping if you like!  Ideas include crushed graham cracker crumbs, chopped nuts, a drizzle of chocolate (white or milk) or powdered sugar for dusting.
      • You can replace the cream cheese with prepared cheesecake or vanilla pudding if you wish. Just mix it in the with the 3 cups whipped cream as you would the cream cheese.
      • Mix and match your berries.  Any combination will work in this recipe! 

      What you will need to make Summer Berry Icebox Cake:

      • 8x8 Pan - this one is perfect for baking chicken or making an icebox cake! 
      • Mixing Bowls - I like to have various sizes depending on the recipe. 
      • Hand Mixer - perfect for those little jobs when you don’t want to grab the big stand mixer. 
      Enjoy!

      With love from our simple kitchen to yours. 

      Do you   love  TSRI?  Don't miss another recipe.  Click here to Subscribe to by Email and receive new recipes in your inbox every day!


      Don't miss a thing! Follow us on Facebook Twitter Pinterest | Instagram ❤ ❤ ❤  

       It is an easy summer dessert recipe that is so simple No-Bake Summer Berry Icebox Cake


      Yield: SERVES 9

      No-Bake Summer Berry Icebox Cake

      Summer Berry Icebox Cake is surely a crowd-pleaser. It is an easy summer dessert recipe that is so simple, but looks like you spent hours making it!
      prep time: 20 MINScook time: total time: 20 mins

      Ingredients

      • 2 cups heavy whipping cream (or can use 3 1/2 cups of your favorite whipped topping like Cool Whip)
      • 8-ounce package cream cheese, softened to room temperature
      • 1/2 teaspoon vanilla extract
      • 1/3 cup powdered sugar
      • 1 teaspoon fresh lemon zest
      • 12 graham crackers
      • 2 1/2 cups mixture of fresh blackberries, raspberries blueberries, and hulled and sliced strawberries, divided leaving the prettiest slices for the top

      Instructions

      1. Whip heavy whipping cream in a stand mixer or in a bowl with a hand mixer just until it holds soft peaks. Add powdered sugar, vanilla extract, and lemon juice and whip to combine until stiff peaks form. Do not over mix. Set aside 1/2 cup whipped cream for topping.
      2. In a separate large bowl, beat softened cream cheese until smooth. Fold in the 3 cups of whipped cream or Cool Whip.
      3. To assemble, spread a thin layer of the cream mixture in the bottom on an 8 x 8 pan.  Place 3 graham crackers across one end of the pan and then break up 1 or 2 more crackers as needed to fill in the gaps to cover the entire layer. Spread half of the cream mixture on top. Use approximately 1/3 of the mixed berries to create the next layer of the cake.
      4. Top with another layer of graham crackers, breaking them as needed to make them fit. Spread the remaining cream mixture over top and add another 1/3 of the berries.
      5. Top with the final layer of graham crackers. Spread the reserved 1/2 cup freshly whipped cream (or Cool Whip) evenly over the top.
      6. Place the last layer of the prettiest mixed berries reserved for the top. Sprinkle with graham cracker crumbs if desired.
      7. Refrigerate for at least 4 hours or overnight until the graham crackers have softened completely. Serve chilled and add optional toppings if desired.


      Disclosure: Posts may contain affiliate links. If you purchase a product through an affiliate link your price will remain the same and will automatically receive a small commission. Thank you for supporting us, it helps us keep creating new recipes.
      Sumber https://www.theslowroasteditalian.com